I have been flying the DJI Air2S for a week or so now and I have to say this is probably the easiest to learn and fly drone I have ever flown.
And the cinematic results from the on-board camera are fantastic.
Let’s have a look and see what the package offers. I am not going to go too deep into technical specifications; there is a complete list of all those at https://www.dji.com/au/air-2s/specs
Main Body

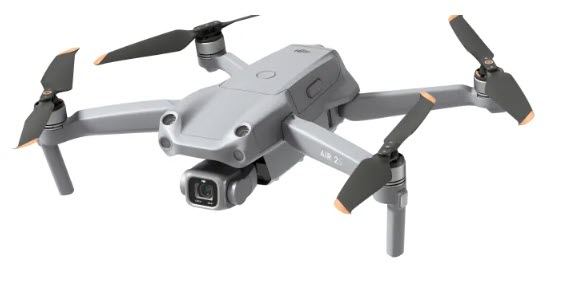
When the arms are folded back, the Air2S is actually about the length and width of an average hand and weighs in at a shade under 600g. So compared to the Mini 2 at under 250g, it is a bit of a heavy weight you could say.
Unfolded, the actual dimensions are 183mm x 253mm x 77mm. The props are actually quite large by themselves at approx. 18cm in diameter.
The battery of the Air2S slots into the top of the body and on one side is a port for USB Type C and the other a slot for the microSD card. Up to 256GB cards can be used, just make sure that if over 32GB you format the card as exFAT.
There is also 8GB of internal storage available.
There is also a bunch of sensors to detect objects and therefore avoid collisions, and these are located at front, rear, top and underneath of the main body. There are no side sensors so you need to be careful if tracking shooting (sideways movement of the drone like a ‘crab walk’).
Note that when flying in ‘sport’ mode (as against normal or cinematic), these sensors are disabled.
For locational purposes, the Air2S uses a combination of GPS, GLONASS and GALILEO protocols. Many are familiar with GPS as most new cars these days have it built in, and for earlier models, the 3rd party market from the likes of NavMan, Garman, Nextech etc is huge. But GLONASS will be unfamiliar to many; simply it is another method of navigation using 24 satellites in orbit at nearly 20,000Km up and is quite new, launching in October 2020.
GALILEO is a third system owned by the European Space agency and is more accurate than GPS, also using 24 satellites that are a fraction higher than GLONASS and launched in 2011.
An onboard compass completes the location / tracking wizardry available.
In short, the Air2S has incredible fail-safe accuracy. One feature I do like about the DJI system is that when flying and using your smartphone / tablet as the viewport – ie seeing what the camera sees – you can switch from the FPV view to a top-down view of the drone’s location via Google maps.
DJI say the battery is good for around 30 minutes of flying depending on the amount of wind. Having had a drone go for a deep drive into 60 metres of the briny in the past (a GoPro Karma obviously now long gone) due to battery issues, I have got into the habit of pulling any drone home at 30% battery life. Having said that, one thing that DJI offer for all their drones (and other kit) is the DJI Care plan so that if something untoward does happen, then it is not going to cost a mortgage to get it fixed / replaced.
And if the drone does go down, it can be recovered by the Google maps / onboard locater system. Theoretically anyway.
Camera / Gimbal
The main party piece of the Air2S is of course the 1” sensor in the gimbal mounted camera. This gives you 20MP stills and 5.4K video with ISO levels of between 100 and 6400 in video and 100 to 12800 for stills.
The aperture is fixed at 35mm/ f/2.8 with a Field of View of 88° and shooting range from 0.6m to ∞
In video mode, up to 120 fps is supported and there is a zoom system (digital) up to 8x. Zooming is not available when recording in either 10bit or at 120fps.
The gimbal has a 3-axis movement with stabilisation. This means you get pan, roll and tilt. In practice, the movement is super smooth and via the joysticks, eminently controllable at varying speeds without any jerkiness.
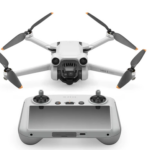
The Controller
Speaking of which.

The controller is identical to the Mini 2’s unit so I have put labels on so I don’t get ‘em mixed up! Your smartphone sits above the controller in a pull up spring loaded cradle and connects (in my case) via USB-C. Lightning and Micro-USB are also supported and cables supplied
I use a sun hood from TOMAT (via Amazon at https://www.amazon.com/Aluminum-Alloy-Foldable-Lanyard-Controller-Accessories/dp/B08912F17V and therefore the supplied USB-C cable is not long enough. I have opted for a simple 0.3 metre one from Jaycar and this suffices. You can also get sunshades for tablets by the way if you want a larger image).
I find the sunshade invaluable as when even in dullish sunlight, the screen glare is atrocious. Shooting late afternoon or early morning – which photographically gives you better ambient light anyway and known as the Golden Zone – alleviates the problem somewhat, but we don’t always have that choice!
The joystick “handles” are detachable as they unscrew and fit snugly in little cubby holes underneath the controller when travelling / packed away.
On the top surface are battery indicators – a quick press of the on/off button at right will show the level remaining – and at the left is the return Home button. Between the two are a slider to change between Cine, Normal and Sport mode.
At top left of the top surface is a customisable button that defaults to operating an LED light on the underside of the Air2S and at top right a video / photo toggle button.
The shooting / video record button is on the front edge at the right and the gimbal tilt controller dial is on the left.
The App

The DJI Fly app is feature packed and probably deserves a review all of its own. Suffice to say, when fired up after the smartphone is connected to the controller, it detects which drone is paired at that time.
Lifting off is as simple a simple button press and the Air2S will lift about a metre and hover.
From there it is just practice and becoming familiar with all the things the drone / DJI Fly app combination can do. These include Focus Tracking in 3 different modes (Spotlight, Active Track and Point of Interest) with additional options for Tracing and Parallel movement of the Air2S.
There are also Mastershots options which I have described more fully at https://filmvideoandvirtualreality.com/dji-air2s-mastershots / Quickshots (which define fixed movements programmed into the Air2S such as Helix causing the drone to spiral around a selected object while ascending and Hyperlapse which creates a timelapse video out of a series of stills.
Inside these are even more options such as Waypoint, Course Lock and Circle.
As I said, allow a LOT of time for becoming familiar and practicing.
Before purchasing, I’d recommend a good read of the very excellent 57 page manual which can be downloaded at https://www.dji.com/au/downloads/products/air-2s.
Conclusion
I have logged about two hour’s flying so far in various locations and certainly don’t consider myself anything even close to an Air2S expert. There are lots of functions I have yet to try (of course weather is also a factor), but have flown enough to, as I said at the top of the article, suggest this is the best and easiest drone I have yet to fly.
It performs brilliantly and has every function needed for the filmmaker I can think of. Of course, the highlight is that 1” sensor and subsequent image quality.
Equally however, for the hobbyist flyer the Air2S would be an admirable choice, albeit being nearly three times the price of the Mini 2 at around $2100 for the More Combo which gives you extra intelligent batteries and is worth the spend in my opinion.
Either way, it’s a lot of fun!
Sample Footage