Gimbals are like, oh I dunno, dash cams. You don’t know you need one until you need one. And then when you have one, you wonder how you got by without it.
I played with a few in my time, and I like the way they can increase your range of expression of shots in a video. And in trying situations, a good gimbal is invaluable.
I’m thinking locations such as filming on boats, or in a moving car – anywhere it is difficult to get a smooth shot due the environment.
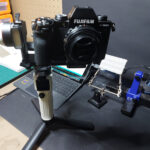
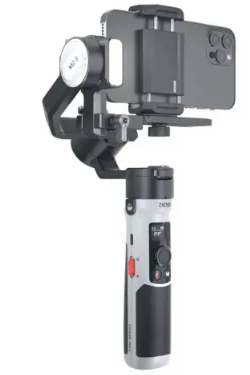
The latest model to to grace my front door via a DHL parcel is the Zhiyun Crane-M2 S. A mid-range model, Zhiyun suggests it is suitable for a large selection of makes and models such as those from Canon (EOS-R, RP, M50, M6, 200D, Powershot G1X Mk II etc), Sony (a7M2, a7R2, ZV E10, a6100, RX100M5 etc) Fujifilm (X-T20, X-A7, X-T2, X-T3, X-S10 etc) and Nikon (Z50, Z5, Z6, Z7 etc) and others.
With these models, camera control is possible via USB-C connectivity from the Crane-M2 S to the camera allowing such things as focus, record, aperture and so on.
I don’t have any of these models sadly, and oddly, my Powershot G1X Mk III – I checked and it is NOT compatible – didn’t work despite its younger siblings being so.
I also tested with a GoPro Hero 10 Black and more on that a little later.
Description / Setting Up
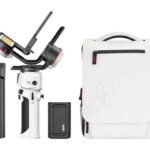
 I received the Crane-M2 S “More” pack which comes with the gimbal and a nifty white carry case also containing a selection of USB cables with type C one end and variations on the other suitable for all the supported cameras, a base screw in tripod, a set of light filters (there is a built in LED light) and an add-on mount allowing smartphones to be accommodated on the gimbal’s quick release plate.
You also get a manual, and I’ll comment on this a bit later too.
Assembly is a one-minute operation effectively; screw the tripod on, attach the quick release plate to your camera and slide it in after pressing its unlock button. If your camera control is supported, you also connect the USB-C cable between the camera and gimbal.
Next, like with all gimbals, you need to balance it correctly in the three axes – tilt, roll and pan. Initially the gimbal is locked and there are small slide buttons to release these locks allowing these locks to be de-activated thus allowing free movement.
Balancing is perfected by sliding the arms of the gimbal and plate along each mount axis. To do this, you lock the ones not being balanced, balance the free one so that the camera stays level, and when tapped, will swing and then return to the neutral position. Once the first is correct (start with tilt), you then lock this and move on to roll, and repeat the procedure for pan.
Depending on the camera, it can take seconds or minutes, but it is imperative to get this right for proper operation.
 The Canon Powershot was easy and took maybe 5 minutes in total. The GoPro Hero 10 Black was another story altogether.
(As an aside, make sure the camera is in an operational mode when balancing. That is make sure you have the lens mounted and extended if necessary and any accessories you will be using during the shoot with the gimbal are also in place. And a hint, take OFF any camera strap).
You see, the GoPro has no forward protuberance (a lens) to give any forward balance, so the camera tends to flop backwards even at the full extend of the axes arms and quick release plate. Eventually I discovered the GoPro mount I was using to mount the camera to the quick release plate had a curve in it forcing the weight of the camera backwards. Turning this around solved the issue, but even then, the tilt axes arm and quick release plate were almost at their maximum extremity.
Here’s another hint. Every time you use the Crane-M2 S (or any other gimbal for that matter), always spend 5 minutes re-balancing it.
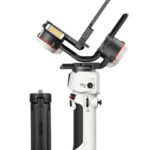
Once all is correct, you turn on the Crane-M2S. You will of course need to fully charge it first using a USB-C cable to a charging point.
Next, you will need to use the inbuilt menu system to adjust the motor torque for each axis to align it with the weight of the camera. This is pretty much an automatic process but can be done totally manually if you wish.
You are now set to go.
Buttons
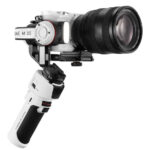
The main shaft handle of the Crane-M2 S has 7 buttons, and these are:
- Trigger for reposition, allowing 180° rotation or return to previous mode
- Light switch to turn the LED on and off or change intensity
- Joystick for menu navigation and control rotation
- Filming if your camera supports gimbal control
- Power to turn the Crane-M2 S on and off
- Menu to access the menu system on the LCD
- ‘M’ button to switch between gimbal modes.
On the LCD, depending on the mode / command in place, there are various symbols shown to signify the current status. Thankfully, sort of, the manual contains a complete list of all these as well as the complete menu structure and description.
I say sort of, and I have made Zhiyun aware of this, like so many companies of late, the supplied manuals are printed in such a small point size that unless you have perfect 20/20 vision, they are almost impossible to read without a magnifying glass – and that becomes tedious.
The company has made the PDF available for download, and these days, this is the first thing I look for before any review, and now have a small USB Seagate hard drive connected, only containing download PDF manuals. This means if I am out I the field, where I also habitually have my Microsoft Surface Go, I can plug it in to get any documentation I might need whether it be for a camera, drone or whatever.
As mentioned, there are various modes available to you with the Crane-M2 S and these are Pan Follow, Lock, Follow, Point of View, Go, Portrait and Vortex and each of these automatically locks different axes via the motors to allow differing camera motions.
For example, in the Follow mode, the roll axis is locked, and the pan and tilt motors follow the rotation of the camera handle. In Pan Follow conversely, the tilt and roll axes are locked and the camera rotates with the handle while panning.
In Vortex mode, the tilt axis motor rotates upward by 90° and the tilt axis, roll axis and pan axis motors follow the rotation of the handle.
In Use
The operation of any gimbal, once you understand the various modes and commands via menus etc, is simple. To master it however takes time and like any sophisticated piece of equipment, you need to practice, practice and more practice.
Yes, within 10 minutes you will be marvelling at what the Zhiyun Crane-M2 S offers in terms of shooting options, but it will take a while before you are using these in an almost automatic mental mode, switching from one to the other without thinking.
It’s actually very akin in mind to flying a drone such as the DJI Air2S; whilst there are only 3 modes (Normal, Cine and Sport), within these are a multitude of options such as Quickshots and other settings, and you need to become familiar with them all to get the best and most out of the unit.
Conclusion
I think everyone who shoots video should have a gimbal, and the Zhiyun Crane-M2 S is a fabulous place to start – depending on your camera of course. One of the beauties of this model is that it does co-operate with a large range of popular and common models so fits in very easily with the workspace.
And while you cannot control a GoPro with it, nonetheless it is a terrific add-on to the native Hyper-smoothing abilities of the GoPro range and extends its capabilities in that area.
For even more flexibility, Zhiyun has made an app available letting you control the Crane-M2 S remotely from your smartphone.
At around AUD$350, it won’t break the bank either.