I have always had a fascination for Space. Even before the first Moon landing, as a kid I had tens of books on it and used to draw with a compass and pencil images and diagrams of the solar system. I even made a rocket “console” out of cardboard boxes and images cut from a magazine as tele-screens.
Then of course Dr Who came along, and I avidly lapped up every single episode (I still have 99% of them on DVD from the very first in 1963!)
And being the son of a photographer, there was never any doubt that I would also follow my Dad’s footsteps in that area, although I doubt he would have envisaged video being in the mix.
(One of the great regrets of life was that when my dad passed away, death duties were still a thing in Australia, and in order to pay them my Mum had to sell my Dad’s prized Leica M2 and a pair of Rolliecord cameras).
Anyway, it wasn’t until much later in life that I married my love of Space with photography. In around 2002 when I lived in Sydney, I spent a few hundred on a Skywatcher telescope and got hold of an older Minolta SLR (film not digital) and played around with it for a while.
Then of course as it does, life intervened and it was only 18 months ago that I resurrected the interest with a brand new telescope, a Skywatcher 130/650 reflector. Sadly, a bit of misadventure stepped in, and the telescope was knocked over damaging the focussing unit. Things being as they are, it has taken 9 months + to get a replacement part (thanks heaps for persisting on my behalf Tasco Australia) and so we are now back up and running.
Stepping up a notch, I joined a few of the Astrophotography Facebook groups and was staggered at the quality of the imagery these people could get from their own backyards! And this led me to a company called MSM.

Some background is needed here before continuing as to why this is important.
As we all know, the Earth spins on its axis, and so do the moons and planets as well as the solar system and even the galaxies. This rotation is why the Sun and Moon rises and sets.
So, whilst photographing the Moon is not so much of an issue as it is bright and you can get by with a short shutter speed, for the planets and stars this is a different beast altogether. Due to the usual dimness of the subject by comparison, you need longer shutter speeds and wider apertures.
 But because of the Earth’s rotation, this causes the planet, star, galaxy or whatever to “drift” across the field of view thus giving star trails and not a sharp focus.
This is where MSM comes in as they make a rotation device that you attach to your tripod and then mount your camera to it. With suitable calibration, this will then counter the Earth’s rotation allowing you to “track” celestial objects and therefore in theory, get perfectly sharp imagery of the planets, stars, galaxies and nebulae.
Of course there is a bit more to it than that, with other factors coming into play and also the need for some compositing techniques and specialist software – called stacking – to get the shots like you see here.
But all that comes after assembling the MSM tracker, getting it on the tripod, adding the camera and aligning it.
Here’s the assembly part.

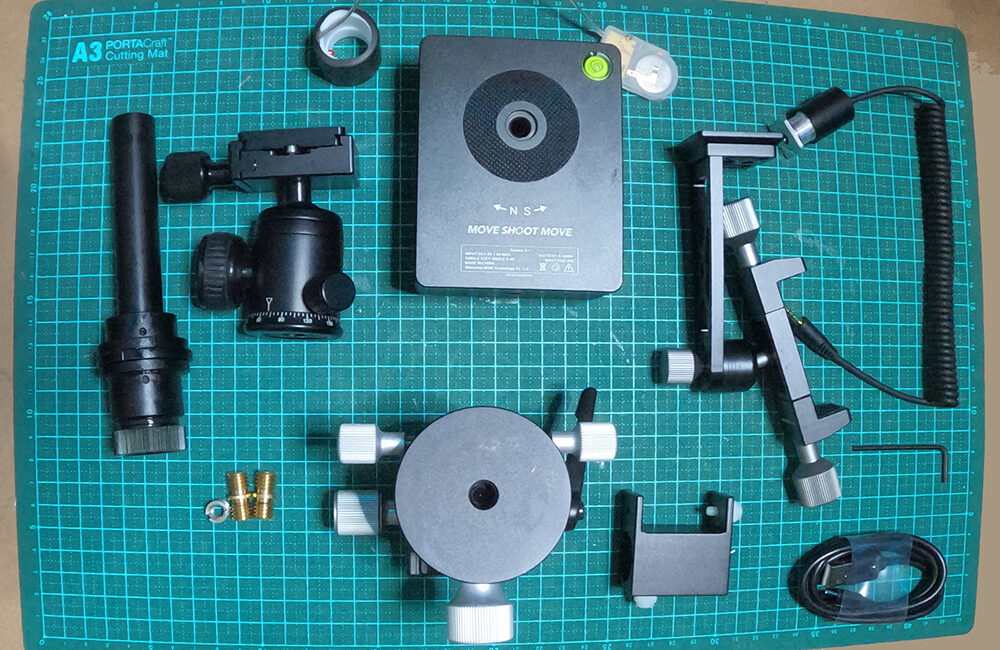
Step 1 was to ascertain how I was going to mount it. As you can see there is the main MSM unit (the rotating tracker), a “wedge” bracket and a “ball head” bracket plus a few adaptors, cables and other bits and pieces.
Initially I mounted the MSM to the tripod plate and added the wedge to the top of that. You get a few thread adaptors in the kit so everything can screw together OK.
The problem here was that the adaptors threads were a fraction short and so the wedge wouldn’t screw down far enough thus leaving it at a 45 degree angle.
A quick message in the MSM Facebook group straightened me out; I need to mount to wedge to the tripod plate, add the MSM to the wedge and then the ball head to the MSM.
Now that that was all assembled, it just remains to add the camera and connect it.
Now that part is completed, In Part 2 I’ll explain how I aligned it and why you need to. Because we are in the Southern Hemisphere and don’t have a “Pole Star” this is a different process to our northern neighbours. If you want to jump ahead, pre-cursor this by getting an app called PhotoPills (Android and iOS).
-

MSM, Tripod plate and Wedge -

MSM Star Tracker -

MSM on Wedge -

The wedge -

Ball head on MSM on Wedge -

With Camera Mounted