Reading just about all the posts in the various Blackmagic Design ATEM Mini Pro forums as I do, it strikes me as interesting that very few people seem to be aware of the macro capability of the Blackmagic Design ATEM Mini Pro along with the Blackmagic Design ATEM Software Control app.
I wonder how many actually know it even exists.
For those who are not aware (and even perhaps do not know what a macro is and have never heard of Lotus 1-2-3 either), a macro is a sequence of operations that are executed automatically by a single action.
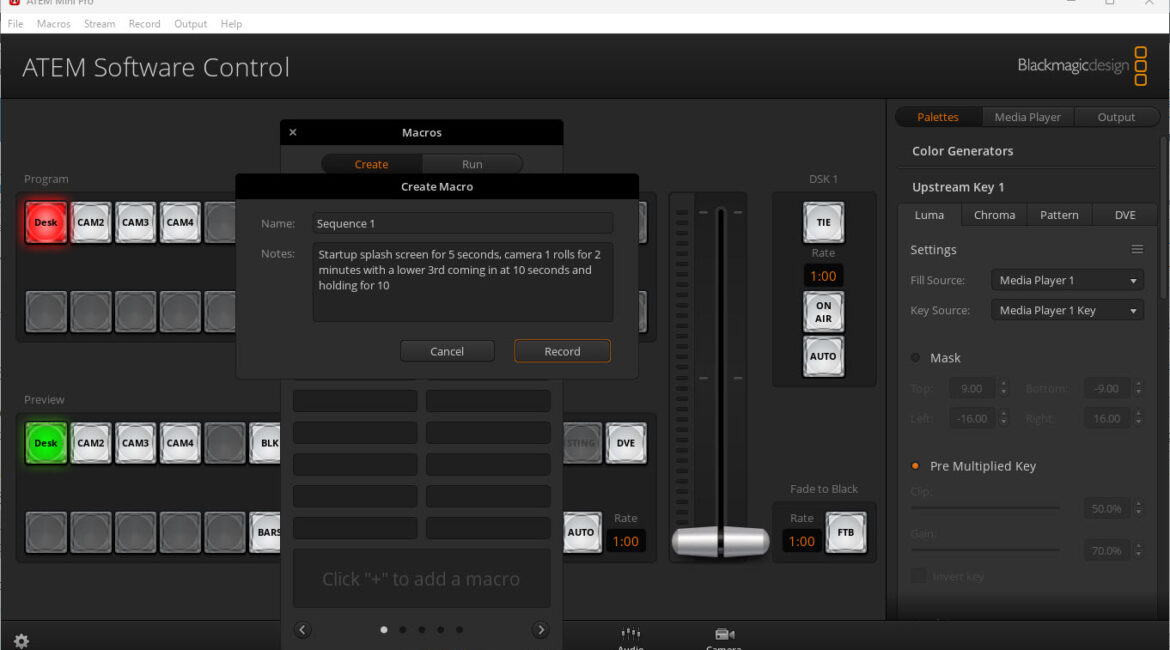
For example, you might have a set sequence of shooting between two cameras that have critical timing. Before it starts, you might show a startup splash screen for 5 seconds, camera 1 rolls for 2 minutes with a lower 3rd coming in at 10 seconds and holding for 10 seconds, a transition of a specific type occurs for 1 second, switches to a graphic for 5 seconds, transitions for 1 second to camera 2 rolling for 2 minutes with a lower 3rd at 10 seconds for 10 seconds and then transition for 2 seconds to a shutdown message.
All of these steps can be listed in the Macro window (accessed from the Blackmagic Design ATEM Software Control app and assigned to a single button. When the button is pressed, voila, the macro runs autotragically!
The Blackmagic Design ATEM Software Control app software has provision for up to 100 macros to be stored within 5 pages of 20 macros each.
In the Blackmagic Design ATEM Software Control app manual, a sample tutorial macro is detailed on page 62, but if you don’t have the manual (you can download it for free here), the steps are listed below.
1 Launch ATEM Software Control and open the macros window.
2 Click on the create button in the macros window to select the create page.
3 Click on a macro slot you want to record your macro to. In this example, click on
macro slot 1. An orange border will appear around the slot you have selected.
4 Click on the create macro button, which is labelled with a ‘plus’ icon, to open the create macro popup window.
If you want to, you can enter the name of your macro and type a description. This lets you easily keep track of your macros and quickly see what each macro does. When you click on a macro, your notes will appear in the status window.
5 Click the ‘record’ button.
The popup window will close, and a red border will appear around your ATEM Software
Control panel indicating your macro is now recording. Notice the red ‘add pause’ button at the top of the border.
6 Click on the bars button in the program panel on the switcher page. This sets bars to your switcher’s program output.
7 Select colour 1 on the preview output.
8 Open the transitions palette and set it to mix.
If mix is already selected, make sure your macro records the setting by selecting a different transition type, for example the wipe transition, then clicking on mix again.
9 Now change the transition Rate to 3:00. This sets the mix transition duration to 3 seconds.
10 Click on the auto button in the transition style panel. Your switcher will perform a mix transition from colour bars to colour 1.
11 To set the switcher to wait for 2 seconds before applying another transition, click on the add pause button at the top of the red border. The ‘insert pause’ window will open.
Set the pause to 5 seconds and 00 frames and click ‘confirm’.
Why set a 5 second pause when you only want a 2 second pause? That’s because when the mix transition occurs, it takes 3 seconds to complete. So, if you want to add a pause, you need to consider the transition duration, plus the pause you want to happen before the next transition occurs.
In this example, it takes 3 seconds for the transition to complete, then 2 seconds for your 2 second pause, so you should enter a pause of 5 seconds. Another way is to add two separate pauses, one for the duration of the transition, and then another for the pause you want. It’s up to you.
12 Now select black on the preview panel, and click the auto button in the transition style panel. Your ATEM switcher will perform a mix transition to black.
13 Click the record icon in the macros window to stop recording your macro.
The macro you just recorded will now appear as a button in your selected macro slot.
To preview your macro, click the run button in the macros window to enter the run page. Select recall and run, which sets the macros window to run a macro as soon as you click on a macro button. Now click on your new macro button, named ‘Transitions’.
14 If you want your macro to instantly run as soon as you select it, click on the ‘recall and run’ button. By enabling this feature, you can load and play your macros with only one click of a button.
If your macro was successful, you should see your ATEM switcher perform a mix from colour bars to colour 1 using a 3 second transition, pause for 2 seconds, then perform another 3 second mix transition to black, all by clicking one button in the macros window! Your ATEM switcher will also display an orange border around your software control panel to indicate a macro is playing.
If you have an idea for something that will be bigger than Ben Hur, it is better to break this down into smaller chunks making it easier to trouble shoot. You can then get one macro to “call” the next and so on.
To give you an idea of something that is useful, such as the fictitious example I gave at the start, I’ll shortly create a tutorial running through the steps one by one.
Other stories You Might Like...
 Blackmagic Design: New ATEM Mic Converter, Studio Camera 6K Pro, ATEM TV Studio HD8
 Tutorial: Live Broadcast Blackmagic Design ATEM Mini Pro Workflow Example
 Tutorial: Adding a remote guest to a Blackmagic Design ATEM Mini Pro live stream
 Tutorial: Streaming Setup Blackmagic Design ATEM Mini Pro Part 1
 Blackmagic Design ATEM Mini Pro. NOT just for Vloggers…
 Blackmagic Design ATEM Mini Pro as an audio mixer? Sure can!
 Quick Tutorial: Blackmagic Design ATEM Mini Pro and Facebook Live using XSplit Broadcaster
Mini Tutorial: Blackmagic ATEM Mini Pro -Getting Started
Quick Tutorial: Blackmagic Design ATEM Mini Pro and Facebook Live using XSplit Broadcaster
Mini Tutorial: Blackmagic ATEM Mini Pro -Getting Started
 Tutorial: 2 ways to add a PIP (Picture-in-Picture) effect with the Blackmagic ATEM Mini Pro
 Tutorial: Setting Preview and switching in Blackmagic ATEM Mini Pro